Try something new. Instead of resolving what you won't eat anymore. Resolve what you WILL eat.
Resolve To eat Whole.
Resolve To eat Organic.
Resolve to Make it Yourself.
You can do it! When your body is healthy, other areas of your life become healthy too. No more feeling bad after eating this or that. No more feeling tired from all the processed food. No more chemicals in your body. Make just three modifications to the way you choose and prepare your food to change the way you feel. For the better. For good.
First, lets be realistic. Make these changes slowly. Fast is not realistic. You have things to learn. You have things to implement. And if other people will be affected by these changes too, it won't be so startling for them. For the record, I am not a nutritionist or a doctor, these are just my thoughts on the subject.
Second, Create a benchmark. Go to your doctor for a physical. Get your blood work done to get a baseline of things that can help measure health like cholesterol, triglycerides, blood sugar, vitamin levels or anything else your doctor thinks you need. Talk to them about the changes you plan to make. Most insurance plans cover at least one yearly physical. Call your company and see if it is included.
Third, track things. Track things like your energy level, how much money you are spending on food, medical costs, and drugs. For example, you may spend more on food, but spend less on doctor's visits.
Fourth, lets get going. Throughout this post I have included references to various books and products that I recommend. The majority of which I have read or used personally. If you don't want to buy these, there are ways to get them cheaper than retail. Check the books out of the library. Purchase the items from Craigslist or search FreeCycle for them. Don't let money stop you.
2. Don't buy food that has more than three ingredients in the list. Ideally it doesn't come wrapped in a package at all.
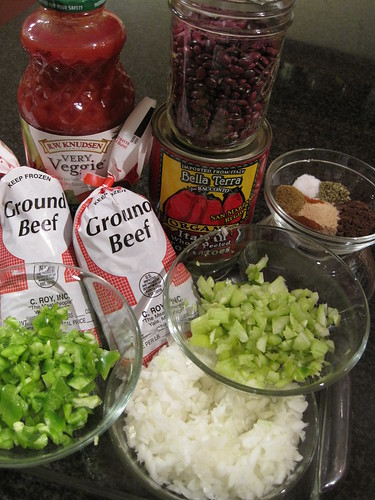
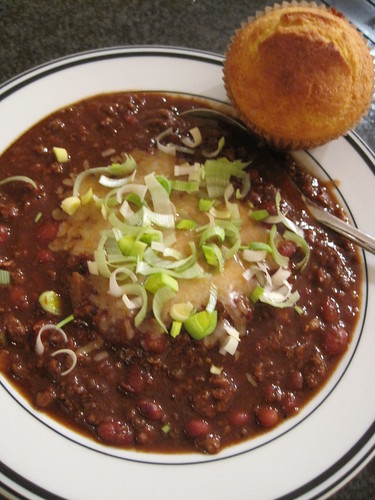
3. Start small. Try to go one day with a whole foods only menu. Here is what I would do for a simple day's menu. Breakfast: Old Fashioned or Steel Cut Oats (I cook mine in a rice cooker for work-free, perfect oatmeal every morning). Morning Snack: Hard boiled egg (I use the same rice cooker to steam my eggs). Lunch: Sandwich on Sprouted bread (usually in the freezer section) with 1/2 a sliced avacado, slice of real cheese, and a tomato (put a touch of salt on the tomato for increased taste). Afternoon snack: Plain yogurt (I love Cultural Revolution yogurt) with a sliced up banana and a small handful of raw nuts. Dinner: Make yourself some chili with grass-fed beef (here is my recipe for 4 minute pressure cooker chili), and top with some shredded cheese and chopped green onions. You can make the same recipe in your slow cooker if you want to have it ready when you get home.
2. Find Local Suppliers of Organic Foods.
Try searching Google for [your state] [product name]. For example, Michigan Grass Fed Beef or Michigan Organic Apples or Michigan Farm Eggs. You get the idea. I really like http://www.localharvest.org/ to find local sources of the product, meat and dairy that your family eats.
3. Start Slowly. Replace items one-by-one from conventional to organic. I don't recommend purchasing food just because it has the USDA organic label on it. Organic chips, sodas, crackers, cereals and pasta sauces are not a good choice whether they are organic or not. They are still highly processed and often contain a lot of sugar and salt. We are going for whole items, packaged as they come in nature. Ideally they don't have more than one or two ingredients in the ingredient list.
Resolve to Make it Yourself.
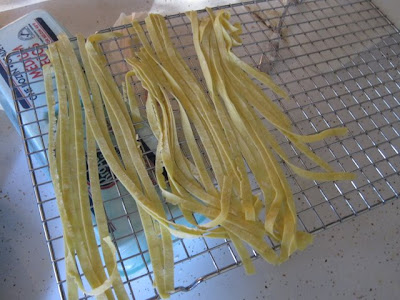
Of the three, this is the part that probably will scare most people away, but it is much easier than you think, especially if you purchase a few appliances to do the job for you. Michael Pollan had an excellent article in the New York Times on cooking that is interesting to read. I don't remember which of his books I read it in, but he brought up an excellent point that foods that used to be a sometimes treat because of how much cooking time they take to prepare, become an everyday part of our menu since we don't have to take the time to prepare them.
You don't have to know how to cook like Martha to eat healthy (and fast). I highly suggest purchasing some tools to make your cooking fast and healthy along with some reference books on cooking so you know where to turn when you encounter a problem. You can cook without these, but it will take you longer to cook & learn. My suggested menu for one day of whole foods cooking is above, but there are so many variations you could make based on your preferences & tastes.
Suggested Books:
You can find my full list of suggested cookbooks on my A MichiganMom's Recommended products under Cookbooks, which you can purchase through Amazon. I am not a huge Martha Stewart fan, but her Cooking School Basics does a great job of explaining basic cooking terms and techniques.
In conclusion, if you did manage to read through this rather long post, you can see that there is some work involved in changing the way you eat, however, the rewards are very worth it. This isn't something you can do the first week in January when your resolution kicks in. It is something to do gradually over the entire year, taking baby steps each week. Use Google Calendar to create a personalized calendar of goals of what you plan to do each week or month. Make a plan that fits you and implement it over the year. You'll be happy you did!
2 pounds ground beef (ideally grass-fed)
2 medium onions chopped
3 stalks celery chopped
1 small green bell pepper chopped
1 Tablespoon Chili Powder
2 teaspoons ground cumin
1 1/2 teaspoons garlic powder
1 teaspoon salt (1 and ½ teaspoons if not using canned beans)
1/2 teaspoon ground black pepper
1/2 teaspoon dried oregano
pinch cayenne pepper
1½ Tablespoons of unsweetened Coco Powder
1 (36 fluid ounce) can vegetable juice (I like RW Knudesen Very Veggie)
1 (29 ounce) strained tomatoes or 1 (29 ounce) can of crushed tomatoes, pureed
1½ cups of dried red beans prepared in your pressure cooker, drained & rinsed OR 2 cans canned red beans, drained and rinsed.
1. Start browning the beef, onions, celery and pepper in the pan until the beef is sufficiently broken up, but still a little pink.
2. Mix all your spices together in a small bowl. Add them to the beef mixture and stir, making sure to coat the entire beef mixture with the spices.
3. Dump in the vegetable juice and tomato puree
4. Cover and bring to high pressure. Cook over high pressure for 4 minutes. Let the pressure come down naturally.
5. Top and Eat Your Chili! Even more Delicious when served with warm cornbread.
For the past year, I have been really good about working out. From November of 2008 to March of 2009 I was going to the gym 4 days a week. Then it got warm enough to fit about 3-4 outside runs in a week. I was doing really well until September of this year. Then my son started a new school that starts at 8AM and my morning workout routine got really messed up. Getting up at 5AM to make it to the gym, workout, get back home and prepare the kids for their day and me for work wasn't going to happen because I usually need to stay up late to work after the kids go to bed.
Enter the Wii.... I've only had it for a week (an awesome Christmas gift from my parents), but this is my plan for Exercise in 2010 while it is cold out (I'll get back to running in summer).
It has a lot of benefits for our family's schedule:
I can workout anytime I want.
No need to worry about the weather.
It isn't dependent on me having to have someone home to watch the kids so I can go to the gym or run outside.
I don't have to try to schedule my workouts around when the gym has the babysitters there.
Bonus: The kids get some exercise too and have just some good 'ole family fun together.
Initially, it may seem like a lot to purchase, but everything above costs a little under $450 (and you don't have to get it all). The gym by us charges about $100+ a month for a family membership. So you can see that the Wii is a cost-effective health investment when compared to a year of gym membership fees.
What are your plans for exercise in 2010? How do you fit in working, being a mom, and trying to keep healthy? I would love to hear from others on how they fit their workouts in each week.
My husband and I have three goals for our children, to raise them to be healthy in spirit, healthy in body and healthy in mind. Usually my blog centers more around the "healthy in body" topic, but today I'll share with you something I am trying this year to help achieve the other two goals; we are going to do advent stockings.
So much of a child's Christmas is about getting that I want to be purposeful about making ours just as much about giving.
Here is the plan. Each day we will do three things. 1) We strung 24 small stocking on the wall. Each day they will pull out a piece of paper that lists an activity that focuses on doing or giving something each day. 2) They will get a small piece of chocolate from their normal advent calendars and 3) We will read one story from the Advent Storybook.
I am really excited about this and thought I would share what we have planned. My children are 2.5 and 4.5 so the activities are centered around those ages. Here is the initial plan:
December 1 - Make Angels to Hang over the Nativity Set
December 2 - Buy 2 Ducks through World Vision
December 3 - Thank a Solider
December 4 - Make a Gingerbread House
December 5 - Gingerbread Puppets @ the DIA
December 6 - Purchase Gifts for Little Boy from our Church Ministry
December 7 - Make Christmas Card for Maltese Family and Send it.
December 8 - Make Banana Bread for Church Staff
December 9 - Deliver Banana Bread to Church Staffers
December 10 - Give Money to Salvation Army Bell Ringers
December 11 - Make Cookies for Neighbors & Sunday School Teachers
December 12 - Bring Blanket to Whole Foods
December 13 - Wrap and Bring in Present for Boy from Church Ministry
December 14 - Bring Baby Bottle to School Christmas Program
December 15 - Deliver Cookies to Neighbors
December 16 - Go to the Store and pick out a gift for daddy
December 17 - Pick out a gift for each other and make a card
December 18 - Donate Food To Rochester Area Neighborhood House
December 19 - Write Thank You Notes to Sunday School Teachers
December 20 - Deliver Thank You Notes & Cookies to Sunday School Teachers
December 21 - Get Our Dog a Christmas Gift
December 22 - Go Downtown to See The Big Bright Light Show & Have Pizza for Dinner
December 23 - Paint a Christmas Ornament
December 24 - Make Grandma & Grandpa their Christmas cards. Help wrap the presents.
So that is the plan. As you can tell, many of the things we are doing are specific to Metro Detroit, but you could easily substitute local activities specific to your location.
There are two times when it is nearly impossible to avoid eating sugar:
1) When you are eating at someone else's house (even when you avoid dessert): Because sugar is in basically everything, I would have had to bring my own food wherever I went all month. That is a little too much for me to think about right now. I know I had sugar when I had a sandwich at a friend's house, bacon in mashed potatoes at my mom's house, and stuffing and bread at thanksgiving (and the stuffing I ate at a Whole Foods Cooking Class) but I am not about imposing inconvenience on my friends and family.
2) When you are sick. My daughter was very sick at the beginning of the month. Never took her to the doctor, so I don't know what she had but I took Elderberry Syrup that has glucose in it to boost my immune system along with some oscillococcinum that has sugar in it.
and Ohh there is one more 3) Thanksgiving day. Although I told myself that I was going to skip the dessert on Thanksgiving, when the time came I just couldn't resist a piece of homemade cherry pie. It was good and worth it. One other failure, I ate a veal nitrate-free hot dog. After I finished, I thought to myself, wow that was sweet and when I checked the package sure enough, it had cane juice in it. Really? Even hot dogs? Incredible!
As I initially said, I was doing this as a health test, not to lose weight. And in case you were wondering, I didn't gain or loose weight. I stayed the same. Here is what I noticed during my little experiment:
* It was really hard in the beginning. If I had been doing it for any other reason, I would have given in and eaten sugar within the first 3 days. But I really wanted to see if I felt different without sugar.
* My sugar cravings diminished over time. In the beginning it was really really hard to not think about what I wasn't having. By week three, it was much easier.
* I never realized I had such a Pavlovian response to sugar. Two times my kids ate ice cream while I was doing this and the whole time my mouth was seriously salivating over the ice cream. It was a very strong response that really surprised me.
* It was awesome to see my kids encourage me. My dad was teasing me trying to tell me that the homemade caramel he made didn't have sugar in it and my son (4 years old) said "Momma I think Grandpa is trying to trick you, I know you are trying not to eat any sugar." When we walked into Maggie Moos to get the kids ice cream at the mall, my daughter (2 years old), put both of her hands to her head in dismay and said "Ohh Noooo. Ice Cream has a lot of sugar in it Mama." I assured her that I would skip the ice cream, but she could still have hers. I think I will make this a yearly thing, although probably not in November again. It was a great conversation starter for the kids.
* Not to get too personal, but my luteal phase is usually too short. This time it was as long as it should be.
* My energy was more constant throughout the day. I didn't have the usual lows of tiredness.
* Although I have been eliminating sugar slowly for the past six months, I was surprised how much I had to still say no too. Mainly desserts when at other people's houses. At first it was hard, but by the end sitting dessert out is a lot easier than I thought it would be.
From doing this I learned that I can give up sugar and feel better when doing so. I honestly don't think one month is long enough to fully realize the benefits of no sugar, so I plan to watch my sugar intake and keep it low over the coming months.
JYAEQM5GGHXA
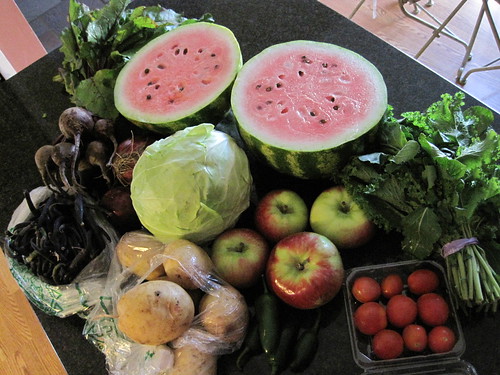
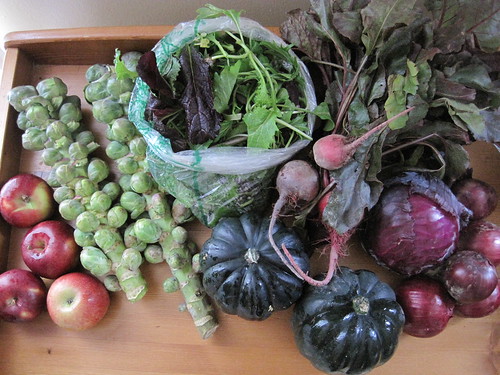
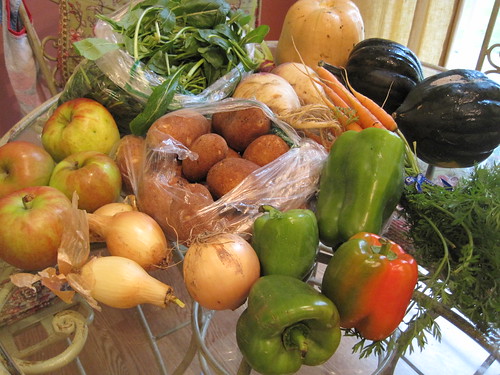
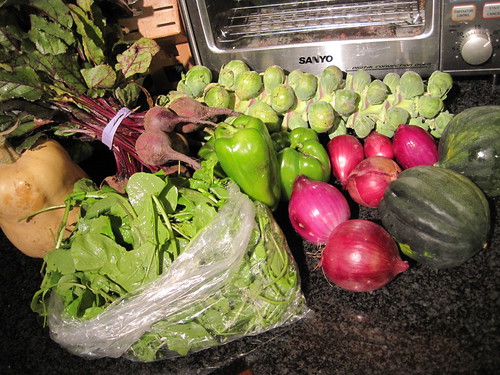
Here is what we got week 20 and how I used it.
Apples - We at them for snacks throughout the week. Brussels Sprouts - Brought them to my mom's house to go with our Halloween Dinner. Acorn Squash - I baked them and pureed the flesh and froze it for use during winter. Cabbage - A Cabbage Salad Red Onions - Used for cooking through the week. Mixed Greens - Made Salads through the week. Beets - Roasted beet salad with walnuts and feta. It was GOOD!!!
And that brings to a close the 2009 Share Season of Maple Creek Farm.
If you found this share interesting, please sign-up for their share program for 2010 if you live in their delivery area. They are offering two share sizes in 2010. A 20-week share to feed 1-2 people for $400 or a 20-week share to feed a family of 4 for $750. All the 2010 share details can be found on their blog.
You may think that sounds like a lot of money for 20-weeks of produce, but I can assure you that the produce is top notch. Produce from even the best grocery store cannot compare. And if you still think this seems expensive. I suggest you watch Food, Inc. to get an idea of what "cheap food" really costs you, our society and our environment.
People often ask me how I get my kids to eat "healthy food." I have a 4-year-old son and a 2-year-old daughter. Here is a list of what tips that work for our family:
Have the Right Attitude. Approach each meal with the mindset that your kids will like what you serve. Don't mention new ingredients, just let them try them themselves. If they do respond negatively, keep the positive feelings going and talk it up.
Make your Kids a Part of the Process. Let them pick things out from the grocery store produce department. Recently, my son saw Parsnips and wanted to get some because he had seen them on Curious George. I had never cooked with them, but figured we could give them a try. We all really liked them! If I had left grocery shopping decisions up to me we never would have tried them.
Start with Small Portions of New Foods. If you are trying something new that you know will take a few times for them to start eating a full portion of, give them a very tiny portion so they can easily follow your directions to "eat it all." Serve it with a big helping of a side dish that you know they enjoy. Up the serving of the new item the next couple of times you serve it so they are increasingly expected to eat more.
Serve New Foods at the Right Time. Our kids always have the choice to eat all their dinner or not eat it and be hungry. Sometimes I serve new things at lunch where this rule is a little more lenient in our house.
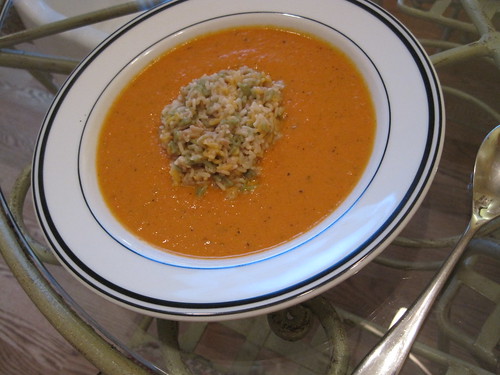
Serve New Food Several Times. Recently I posted my recipe for Tomato Soup with Alphabet Pasta. The first time I served it to my kids, they had one bite. The next time, two bites. The third time, 1/2 a bowl. And now when I make it, they look forward to it and follow up with a "yummy that was good. Make that again Mama."
Make Trying New Foods Fun - Have a taste-test of the week time. Grab a few new foods and let them try them. Allow them to tell you what they do and don't like about the new foods. They could start a food journal if they know how to write. Or they could draw pictures of the new food if can't write words yet. Use your words and positive attitude to talk up new foods "Guess what guys? We get to [don't save have to] try some new soup soups today. You guys are really going to like it because it has chicken in it"
Cook with Your Kids. My kids like to cook with me. There are a lot of things that a 2 and 4 year-old can do to help while cooking. My kids help me measure, dump the ingredients in the bowl, get the ingredients, put away the ingredients, wash a bowl, mix things and cut up ingredients (mine love to use a plastic knife to cut the carrots into chunks before I put it in the food processor). You need to set ground rules. Before we start I always say to them "what is the most important park of cooking?" they answer "listening." "And what happens if you don't listen?" I ask. "We get down." Meaning they have to get off the chair next to the counter and don't get to help anymore. You may have to follow through on this threat a few times before cooking with them gets pleasant.
Teach them Where the Food Comes from. Take them to a local farm. Help them make a list of questions to ask a farmer at the farmer's market. Plant a garden with them. Search the internet for fun activities that will work for your family.
Watch Cooking Shows with Them. Talk about the ingredients. Ask them what they think looks good. We are big fans of the PBS channel Create. My kids really like Lidia's Italy. She goes places to see how the food is grown/made and then makes something from it. If they like the looks of something that was made, I find the recipe and make it for them or with them.
Have Discussions About Your Family's Food Choices. Explain to them why you (and they) eat healthy food. When they do have "junk food" and you notice that maybe they aren't feeling too well, start a discussion about how they feel. Start with a question, not a lecture. "How are you feeling after all that candy? You think you might be crying because you are tired from eating all that candy?"
Reinforce their Healthy Eating Habits. Whenever we measure my kids, I say "wow, you must be eating all your vegetables, because you sure are growing"
Don't Buy Food with Cartoon Characters on the Box. Generally speaking, food with a cartoon character on it is pretty likely to contain a lot of sugar and/or sodium. The food industry is working on programming us to eat more. Cartoon Characters are only one more part of the psychological process they use to program our kids. This is similar to Michael Pollen's rule: "Don't Eat Food that Makes Health Claims"
Don't Assume What Foods they Will or Will Not Like. I never liked fish when I was a kid. For awhile, I assumed my kids wouldn't either. But I picked up some Salmon at Whole Foods and baked it and they both LOVED it! I am not crazy about unsweetened kefir. But it is the only thing my daughter drinks besides water. Had I imposed my own tastes on my kids, they would have missed out. Yes, sometimes this means gagging down an ingredient that you don't like to set an example and get them to try it.
Let THEM Pick Out the Foods they Don't Like. If they don't like a specific ingredient in a dish, let them pick it out, but make them pick it out. If they are young, they won't be very good at it, so they will miss some, eat it and get used to it.
Try New Varieties of Foods. I've been wanting my kids to eat raw salad greens for sometime, but whenever I bring up the fact that they should try eating some salad It is not met with excited anticipation. Last week I told them "I know this great lettuce that kids like. Do you want to try it?" My son said, "sure." So I picked up some mache salad. And served it with some grapes and they really liked it.
Promote the Food in a Dish you Know They Will Like. Sometimes if I serve something new, my son will say "I am not eating that." I tell him "really? Why not? You like carrots, you like chicken, you like crust and you like peas. All that stuff is in there. You will really like this Chicken Pot Pie."
Accept that they Won't Like All Foods. As much as I would like my son to eat oatmeal with the rest of the family, he simply doesn't like it. He's tried quick oatmeal, old-fashioned oatmeal, steel cut oatmeal - all several times and he never has grown to like it. I have accepted that he doesn't like it and he can have a banana or piece of sprouted bread for breakfast. I don't like EVERY food I taste, so why should he? He eats almost every food I put in front of him, oatmeal isn't going to be one of them.
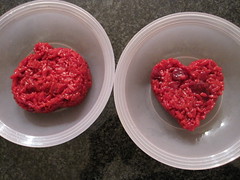
Name it or Shape It. Yesterday my kids weren't too excited about the prospect of eating Beet Risotto, so I renamed it Red Rice and used some cookie cutters to shape it into their favorite shapes, a pumpkin and a heart. If food manufacturers can do it, so can you!
Model What you Want Them to Eat. Your kids won't eat healthy if they see you eating junk all day. So ask yourself before you eat that second cookie. "Would I let my kids eat this?" If the answer is no, don't eat it. This question helped me cut out a lot of the junk I used to eat when my kids weren't looking.
Be Patient and Realistic. These things take time. I've been at this since my kids started on solids. Sometimes we have a bad month where they don't want to eat anything new. That's ok. Take a month off and re-eat the healthy foods you know they like.
What are your favorite tips to get your kids to eat healthy foods?
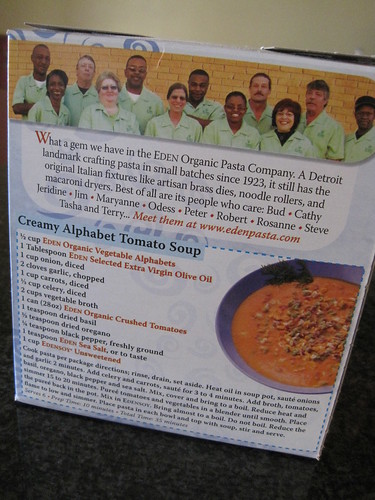
I am a big proponent of using recipes from the back of boxes and packages. I think that companies want their ingredients to shine through so why wouldn't they provide you with a recipe that was top notch? This attitude helped me stumble on the recipe for Creamy Alphabet Tomato Soup that I saw on the package of Eden Foods' Vegetable Alphabets. I modified the recipe, because I am not a big fan of soy. But it is really yummy, the kids and hubby like it - a lot! It will come in very handy if you have a hand blender, but a regular blender will do, you just have to work in batches.
1 Tablespoon Eden Extra Virgin Olive Oil
1 cup onion, diced
2 cloves garlic, chopped
1 cup carrots, diced
1/3 cup celery, diced
1 1/2 cup Chicken stock
28 ounces can of Eden Organic Crushed Tomatoes(FYI: their cans aren't lined with BPA)
1 teaspoon dried basil
1/2 teaspoon dried oregano
1/4 teaspoon freshly ground black pepper
1 teaspoon Eden Sea Salt, or to taste
1/2 cup Eden Organic Vegetable Alphabets
1 cup heavy whipping cream (milk or half and half will substitute fine, it will just be a little less creamy)
Directions
Cook the pasta according to package directions, rinse, drain and set aside.
Heat the oil in a medium soup pot. Sauté the onions and garlic for 2 minutes. Add the celery and carrots. Sauté for 3 to 4 minutes. Add the basil, oregano, black pepper, sea salt and tomatoes. Mix, cover and bring to a boil. Reduce the flame and simmer for 15 to 20 minutes until the vegetables are tender. Puree the soup using a hand blender. Mix in the cream and cooked pasta. Bring almost to a boil. Do not boil. Reduce the flame to low and simmer 1 to 2 minutes until the pasta is warm and serve.
Note: My kids like it when I pile the pasta in the middle, rather than mixing it into the soup as the recipe states above.
Omitting foods that don't have healthy replacements (granola bars, sugar in my coffee, cereal)
Reading labels to make sure there are no added sweeteners in the ingredient list.
These things have made a big dent in how much sugar I eat compared to six months ago. I have noticed a lot of differences since reducing my sugar. But now I am interested in what would change if I gave up all sugar for a month? So that is what I am doing, November of 2009 is going to be sugar free for me.
To me a No Sugar November means:
No sugar.
No corn syrup.
No sweeteners, fake or real, of any kind in the ingredients list of anything I buy.
Naturally occurring fruit and milk sugars are OK.
Those are the rules I made for myself. Some of this will be easy for me (I haven't had Corn Syrup in a long time). Some of it will be hard.
I think my biggest challenges are going to be:
Giving up my baked good. I don't bake nearly as much as I used to, and what I do bake now, usually has raw honey or sucanat in it in place of sugar, but I think I will miss them.
Giving up raw honey. I thought a long time to see what I was going to do about raw honey. I believe that raw honey can be a great sweetener with health benefits, but for this month I will give it up.
Giving up my teaspoon of brown sugar in my morning oatmeal.
Giving up my occasional treats with friends and the kids.
So why am I excited about "Giving Up" so much? I think it is going to be fun to see all that I GAIN from giving up my bad sugar habits!
When I need a gift for someone I usually go to Catching Fireflies. It is a local store in Rochester, Michigan; but they also have a location in Ferndale and an online store.
I shop there because they have unique items at a variety of prices for their respective age groups. And even better, they offer free gift wrapping. There is nothing I like more, than driving away with my present already wrapped and ready to go on the seat next to me:
I thought it might be fun to give away a $50 Gift Card to Catching Fireflies to one lucky reader. You can use the card at their online store or at one of their Rochester or Ferndale stores. As you can see from the pictures below, it is a very fun shopping experience. My personal favorite sections are the kitchen section and the purse/jewelry sections.
To enter to win, all you have to do is comment on this post. On Monday, November 9th I'll use random.org to generate a random winner and the $50 Gift Card will be sent to you, just in time to buy a Christmas gift for yourself!
Here is what we got this week and how I plan to use it:
Apples - My son and I ate two the day we got them, and they were excellent. Two more left for a snack this week. Brussels Sprouts - Bringing them to my mom's house to go with our Halloween Dinner. Acorn Squash - I am going to try and bake them, puree the flesh, and use it in my pumpkin bread with coconut milk recipe. I will post the recipe. Cabbage - A Cabbage Salad Red Onions - For cooking through the week Mixed Greens - Salads through the week Beets - Roasted beet salad with walnuts and feta.
I am so sad that the CSA season is over. The quality of the food we have been getting every week is far superior to what we can get in the grocery store. For example, this week I bought some Kale at the grocery store. Compared to what I've been getting in the share or at the farmer's market, this was some sad Kale. It was slightly wilted, had no smell to it, and the leaves were very small.
During the season I would pick up the share during lunch and bring it back to my office until I was ready to go home. Every week without exception the share would small my entire office up with the wonderful aromas of whatever we got that week: apples, kale, onions, cabbage, arugula, everything. This is what is frustrating about living in Michigan. I love the fresh fruits and veggies, but our choices for fresh, locally grown fruit and vegetables are almost non-existent in winter. June seems like such a long way away....
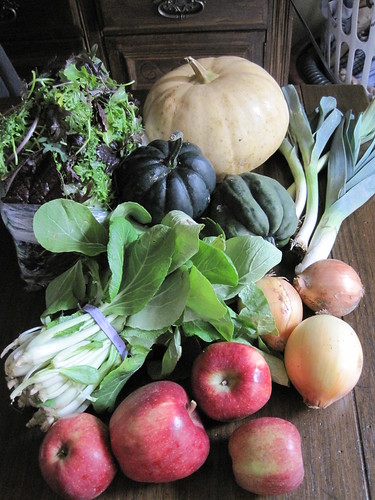
Long Island Cheese-heirloom pumpkin - This pumpkin is waiting for a thanksgiving pie :-) Mixed Greens - Made a couple of salads out of these through the week. They were really good. I find myself craving greens more and more. I feel like in the absence of sugar (more about that in an upcoming post), my body is able to identify what real foods I am really craving, like greens, kale, specific fruits. When I eat too much sugar, I feel like I just crave more sugar, not specific foods. Chinese Cabbage - Made a Cabbage salad out of them with sesame seed oil and rice vinegar. Apples - Snacked on them through the week Acorn Squash - Found this recipe from Alton brown for Squash Soup and made it. It was VERY good, but almost too rich. It would be better be served as cup of soup with something as a main dish rather than a bowl of soup for the main course. Leeks - Used them in a Kale lasagna. Onions - Cooked with them through the week.
Here is what we got this week and how I plan to use it:
Long Island Cheese-heirloom pumpkin - Pumpkin Pie...what else? Mixed Greens - Salads Chinese Cabbage - Salads Apples - Snacks through the week Acorn Squash - Found this recipe from Alton brown for Squash Soup. Leeks - Cooking through the week Onions - Cooking through the week
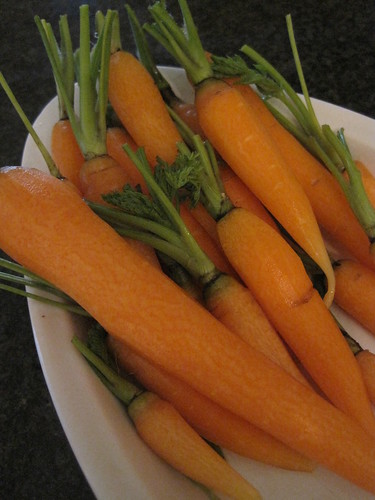
Carrots - I peeled them and my son and I ate them for a snack one afternoon. Apples - snacked on them through the week Onions - used them for cooking through the week Green Peppers - still have to stuff them and post the recipe here. Vitamin Greens - Made a Vitamin Green Salad. Potatoes - Used through the week, still have some left (truth: I HATE peeling potatoes, so I really have to be in the mood to make them) Squash - I have a lot. On Thursday, I plan on making this soup. Rutabagas - Adventure FAIL. I peeled them and boiled them with 2 carrots and 3 small potatoes. When they were done, I drained them and put them in the food processor. I added some butter and turned the food processor on. I really should have used a food mill, but I don't have one, so I improvised and added some milk to the mixture so it would run through the food processor more smoothly. It was VERY sweet. It would have made great baby food. It tasted like I had added about 1/2 cup sugar to it. Way too sweet. But now I learned my lesson and my husband has a gift idea for me - hint hint.
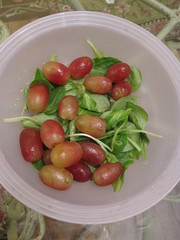
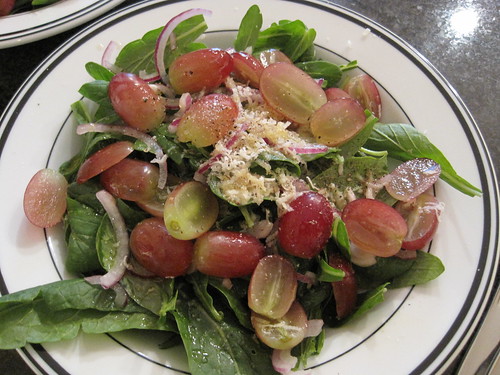
A few months back, I made a Vitamin Greens Salad with the Vitamin Greens we got from the share. It was good, but at the end of the post, I mentioned that it needed some sweetness. Well we got the greens again this past week so I attempted Vitamin Greens Salad Part II. This version was MUCH better.
To offset the slightly bitter flavor of the Vitamin Greens I cut up some very good, very sweet grapes. I added some thinly sliced purple onions and some shredded raw Parmesan cheese. Then I sprinkled it with salt and pepper and drizzled olive oil, toasted sesame oil and apple cider vinegar on the top. It was really good. The sweet grapes and the tart vitamin greens complimented one another nicely.
If there is one thing that can say revolutionized my cooking more than anything else, I would say it is a Pressure Cooker. Last spring I picked up a late model Fagor Pressure Cooker from Craig's List.
I initially bought the pressure cooker because I wanted to start using dried beans in all my recipes instead of the canned ones. With a pressure cooker you can make dried beans without presoaking or thinking ahead. Awesome, right? But little did I know that I would use the pressure cooker for soooo much more.
I was so excited when I first got my pressure cooker, that I updated to Facebook status saying so. I received a lot of cautions to be careful on and offline. What you need to know is that today's pressure cookers are much safer than the pressure cookers our moms and grandmas used. A safe modern pressure cooker will have three safety measures: a pressure regulator, vents to let out excess pressure and windows in the top that open in the event of excess pressure.
I LOVE my Fagor Pressure Cooker, and here is why:
1) Cooks food FAST! My Chili took 4 minutes on high pressure yesterday. Homemade Chicken Broth in 30 minutes. Lentil Soup in 7 minutes. Soups and Meats that used to take me an hour or more to make are done in minutes. Those minutes are precious when I get home from work tired and hungry and want to prepare a healthy meal fast for my family. When I use my food processor to prep the ingredients, even the chopping only takes a couple of minutes.
2) Uses a lot less energy than boiling something for hours or putting it in the oven. That means it is green and it saves you money on your electricity bill.
4) Great Food - The food from a pressure cooker is great. Unlike a slow cooker, where sometimes I feel like the food kind of disintegrates and tastes a little off, I think the pressure cooker helps things taste better. You can buy a cheaper cut of meat and it will taste as tender as a pricey cut of meat.
.....But, there are a few things you will need to know about Pressure Cooking.
* Because the food is cooking under pressure, it is a little bit louder than using a traditional stock pot. I am sensitive to noise, but because it is only for a few minutes, I can handle it.
* You will have to spend some time learning how to cook things in a pressure cooker. I highly recommend the Pressure Perfect book that has recipes and charts that will teach you what you can cook in a pressure cooker and how you can adapt your own recipes to your pressure cooker. I spent about 30 minutes reading through the first pages. I consult the book frequently as a reference to adapt the recipes I already use.
* Not everything cooks in a pressure cooker. You need to be careful when cooking things with tomatoes in them. It can be done, you just need to do it right.
Here are some additional pictures of my Fagor Pressure Cooker:
Here is what the inside of the lid looks like:
Here is what a Valve Looks Like. It attaches to the lid:
You can buy a Pressure Cookers from a variety of places, but if you find this post useful, you can buy it through the link below and I will receive a small portion of the sale value.
While making my kids some decaf Chai lattes the other day, I had an idea. Why not make myself some Chai Tea Yogurt? Homemade Chai Yogurt would have two benefits: 1) Caffeine and 2) Chai Tea
Here is how I made my Chai Tea Yogurt.
Specific directions on how to make basic yogurt are at the end of this post.
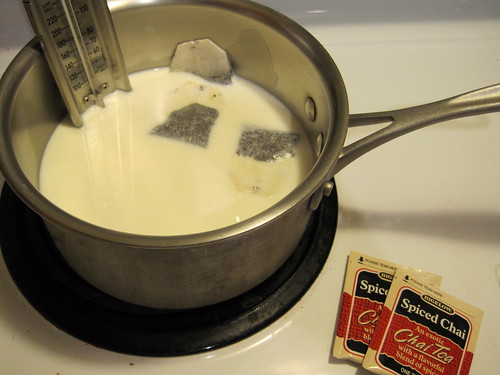
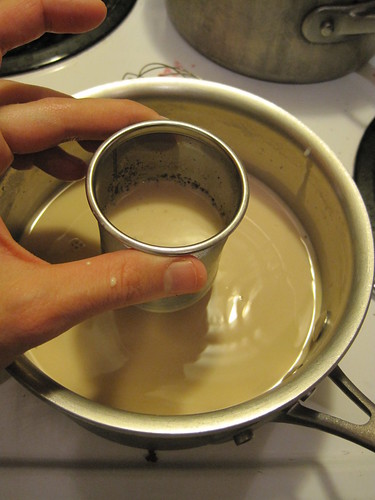
First, I put three tea bags in the milk as it was heating up.
While the milk was getting hot, I stirred a little too vigorously and the tea bags broke, opps
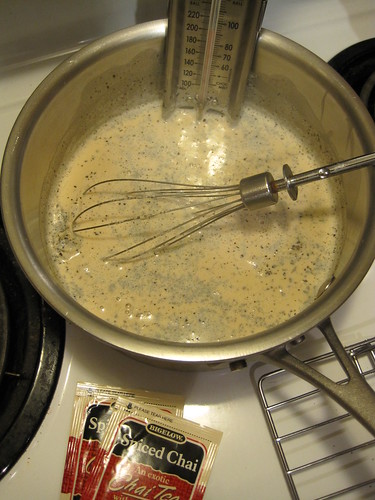
But that wasn't a problem because I pulled out my tea strainer and strained the tea leaves out once the temperature got low enough to add my yogurt starter in
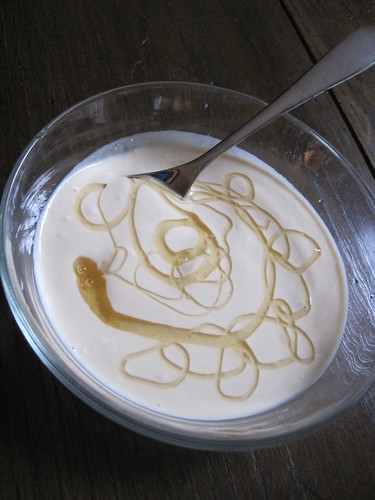
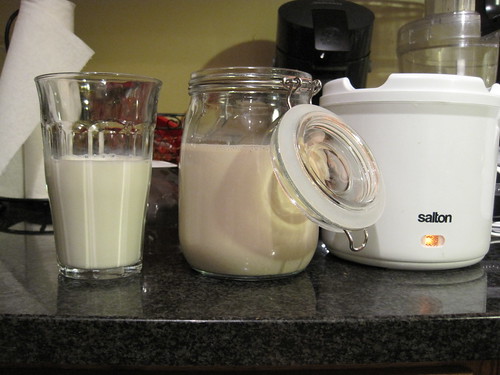
Then I put it in the glass jar pictured below to put in my yogurt maker. I thought it would be interesting to put a glass of milk next to it, so you can see the color difference, and how much the tea infused the milk.
waiting....waiting...waiting....and it is done. Oh wait, not yet. It had to get it cold. I put it in the fridge and finally when I got home from work, I tasted it.
It was good! I usually like to eat my yogurt plain and sweeten it by adding some cut-up fruit. Without fruit, the tea added a nice subtle flavor without being over-powering. I added a little bit of raw honey to see how it would taste sweetened...and it turned it from good to great! I am happy with how my Chai Tea Yogurt turned out. I plan to try other flavors of tea and maybe even a few Senseo coffee pods sometime.
If you haven't made yogurt before, it is very easy. All you need is milk and a plain yogurt with active live cultures (look for this on the yogurt package). I find that a yogurt maker and thermometer with an alarm make my results a little more consistent, but you definitely don't need one.
How to Make Yogurt with a Yogurt Maker:
Here is a printable recipe for those who have a thermometer and yogurt maker. I omit the powdered milk because I like to keep the unnatural ingredients to a minimum. If you do omit it, your yogurt will be a little runnier. Alton Brown says he finds 2% milk "the perfect balance between flavor and texture" and I tend to agree. If you are more of a visual person, here is his video on making yogurt.
Here is what we got this week and how I plan to use it:
Apples - For snacking through the week Onions - For cooking through the week Green Peppers - Stuff them....again. This week I promise I'll post the recipe specifics. Carrots - For snacking through the week Vitamin Greens - I'll make a few salads out of it to serve with dinners. Potatoes - Save for cooking through the week Squash - I have a lot. Need to get kicking making something. Rutabagas - Hmmm. This is going to be the first time I cook with Rutabagas. I'll probably consult a fewof the bookson my shelf to learn more about it and then decide on something. I've never cooked or eaten Rutabagas so it should be a fun adventure.
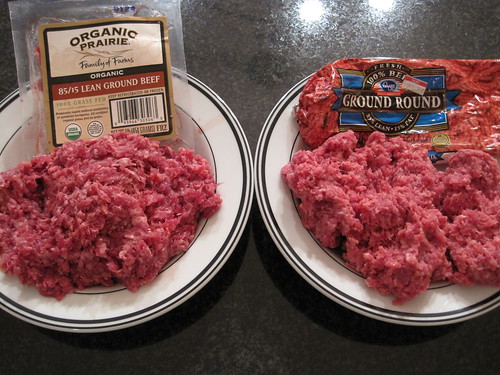
Many people are scared of ground beef. And honestly, you should be afraid if you aren't buying grass-fed beef from a trusted source. Feed-lot beef is not heart healthy and it carries the very real risk of e-coli contamination. Grass-fed beef, on the other hand, is lower in saturated fat, higher in omega-3's, conjugated linoleic acid (CLA), vitamin A and vitamin E (source: Time Magazine).
But I wondered does Grass-fed beef taste any different than Feed-lot beef? I'll cheat and tell you the answer before I finish, the answer is a resounding, YES!!
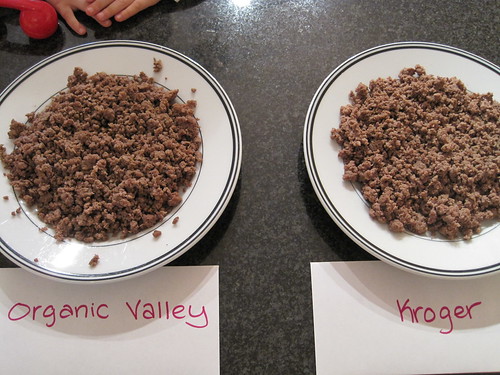
The picture above shows you the two brands I compared. Honestly, I usually buy my grass-fed beef at one of the local farmer's markets or from Creswick Farms, but I wanted to compare grass-fed beef that anyone can purchase. So I compared Organic Prairie Grass Fed Ground Beef ($5.82 per lb) and the Kroger Ground Round ($2.99 per lb). The organic prairie is obviously more expensive out-of-pocket, but I think the long-term health benefits make it a more economical choice in the long run.
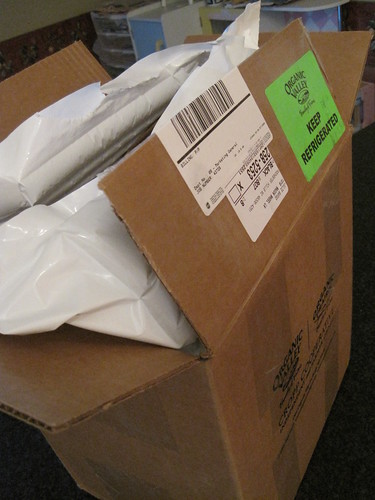
You may wonder about ordering meat online. How does it arrive? Well, here is how it comes. Snuggly wrapped in a cooler box with two cooling packs (my order had more than just meat):
Then I browned it in the pan. I noticed two things when I was browning it. First, the Organic Prairie grass-fed beef had a little more blood in the package. I just drained it out before I put it in the pan. Second, the Kroger brand was stringy. If you look at the top picture you will notice that the Organic Prairie looks a little more chunky, while the Kroger is more mushy. This mushiness was really noticeable as I was trying to break it into chunks while browning it. Here are both of the versions on a plate:
Once they were cooked, I couldn't feel that much of a difference when I rubbed the crumbles between my fingers.
Then I cooked it up into this stuffed eggplant and our family did a little taste test. First we ate the eggplants that were stuffed with the grass-fed beef. They were good. Then we ate the ones stuffed with the feed-lot beef. The feed-lot beef filling was tasteless. While the grass-fed beef picked up all the other flavors and tied the stuffing mixture ingredients together, the fed-lot filling was just filling. It wasn't bad, but it wasn't good...it was just there.
For a long time I considered myself to be a failure at all of my mother-in-laws recipes because they never tasted as good as hers. But since our family has switched to the grass-fed beef I am finally tasting some success. She lives in Malta where feed-lots don't exist, so it wasn't my cooking skills, it was the beef. :-)
UPDATE: This post is getting a lot of traffic for the term "where to buy grass fed beef in Michigan" with slight variations. If you found this page through that search, I suggest you head on over to mySoutheastern Michigan Local Organic Food Sources Guideto find a few suppliers that I know of who sell grass-fed beef in Michigan.
Here is a summary of what I have done with the shares for the past two weeks:
Here is how I used Week 16's Share: Eggplant - Pictured above, I stuffed them with a mixture of ground beef, onions, cooked eggplant flesh, salt & pepper, eggs and bread crumbs. Leeks - I cut them up and used it in a cabbage salad. I was half way into making it when I realized that I didn't have a lemon for the dressing. I used vinegar instead, but the lemon would have been much better. Cabbage - I used 1/2 for a cabbage salad mentioned above and the other 1/2 for a Borscht Soup from the Pressure Perfect cookbook. Green Peppers - I stuffed them with a mixture of ground beef, bulgar, onions, eggs, breadcrumbs, salt & pepper. I put them in the slow cooker and had them cook in a tomato sauce (1 28-oz. can of crushed tomatoes, 1 14-oz can tomato sauce, 1 tsp fennel seeds, 1 tsp salt, pepper to taste, and 1 tsp garlic powder) that I used the next day for a pasta sauce. It turned out very nice, and convenient. Acorn Squash - Saving for after the season, probably for some soup. Apples - My friend let me borrow her food dehydrator and we made some yummy dried apples. Delicata Squash - I still plan to remake them as a twice baked version, since I had some improvements I wanted to make from last time, but have to do it soon. Brussels Sprouts - I saw this recipe for a side dish. I used hot dogs since it was the first time the kids ate Brussels sprouts. They were really good, but the kids were still a little leery on them. I will persevere and find a way for them to eat them! Mixed Greens - Salads throughout the week. Summer Squash - put them on the BBQ for some end-of-summer fun! Onions - Used for cooking during the week.
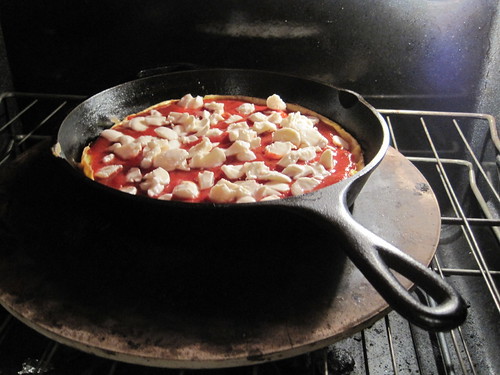
Here is how I used Week 17's Share: Acorn Squash - Soup Onions - Used for cooking for the week Arugula - Arugula Pizza. It was excellent. My husband said it is the best arugula he has had in the United States. Butternut Squash - Storing for winter. Beets - I made this Borscht soup from the Pressure Perfect cookbook. Brussels Sprouts - Side Dish. Made the same recipe from above. Green Peppers - Cut up and froze for winter use.
Here is what we got this week and how I plan to use it:
Acorn Squash: Soup Onions: Use for cooking for the week Arugula:Arugula Pizza. Butternut Squash: Roast it Beets: Soup Brussels Sprouts: Side Dish Green Peppers: Cut up and freeze for winter use.
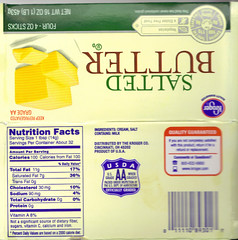
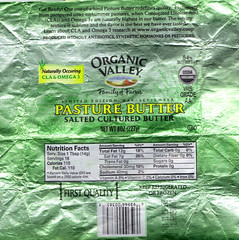
Inspired by my dad's recent question at Sunday dinner, "Why is your butter so yellow?" I decided to do a little butter review. The folks at Organic Valley were kind enough to send me some to review. I took a little trip to the local Kroger store and bought some of their store-brand butter to compare against the Organic Valley Pasture Butter they sent me.
First, 3 Comments for the Butter Haters:
1. My definition of real butter is; butter made from cows who have been grass-fed.
Nutrition Label Comparison.You can click on the picture to see the full-size label if you are interested (it will open in a new window). The differences are the Kroger butter has over twice the sodium (90 mg vs Organic Valley 40mg). The Organic Valley butter has 1 more gram of total fat (12 grams vs. Kroger 11 grams) but both have 7 grams of saturated fat.
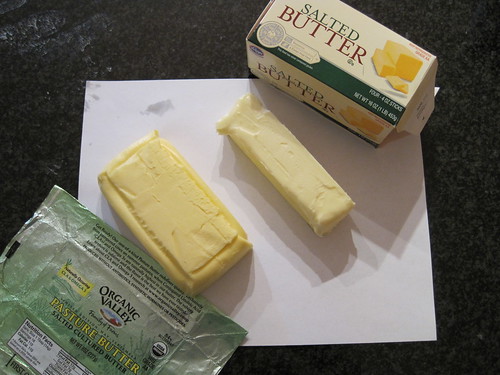
Color Comparison
You can see that the Organic Valley butter is much more yellow than the Kroger butter. Why? Because grass-fed cows produce more beta carotene and it makes the butter more yellow.
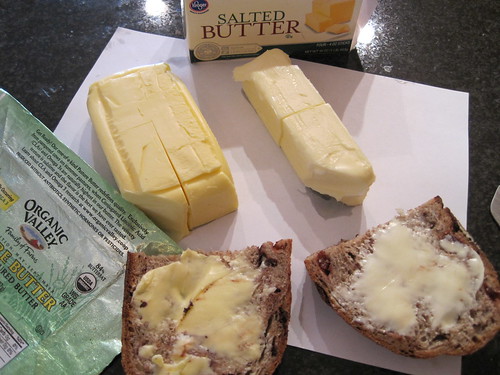
Let's Taste it on Some Bread
We picked up some Chocolate Cherry Bread from the Give Thanks Bakery and put a little on each of our pieces. WOW. What a difference. My mom, my husband, and I immediately noticed the difference (they didn't know which one they were eating, but I did). The Organic Valley had a rich buttery taste as soon as we all put it in our mouth. The Kroger butter was tasteless. The second time I tasted the Kroger butter, I timed myself and it took 10 seconds until I was able to taste the butter. From 0-10 seconds the butter was just kind of a tasteless wax. All of us noticed this very obvious difference in taste.
Lets Bake It Up
My mom and I decided to try making sugar cookies with the each butter to see if we noticed a difference. We weighed the ingredients to make sure everything was the same.
While creaming the butter and sugar (yes, way too much, these were a real treat) together the Organic Valley butter mixture was much more soft than the Kroger butter mixture. Once we added the flour, the Organic Valley mixture was noticeably moister. Not sure why? Maybe you have an idea? Leave it in the comments section.
Below you can see the finished cookies. As you can see, there really isn't too much of a difference in how they look (The Kroger ones have a line in them so I could tell them apart).
But how do they taste? The taste difference wasn't as overwhelming as when we all tried the butter on the bread, but we did notice a slight difference. Both cookies were very good, but the Organic Valley ones did have a more buttery flavor. The texture was a little different too, but that could be to the additional flour I used when I was rolling them out, due the aforementioned very moist dough.
Summary
Before I started becoming more educated on the benefits of dairy products from grass-fed cows I used to regularly buy the Kroger butter. I never really had any bad results when using it for baking or cooking. However, now that I have taste tested the two side-by-side AND know the health benefits of the grass-fed over the corn-fed butter, I'll continue to buy the Organic Valley or Kerry Gold butter I usually buy.
Please don't think I am saying that Kroger is bad. They have a very good organic section where I frequently purchase many of their organic foods. The Organic Valley Pasture butter is cheaper at Kroger than at Whole Foods, so I always shop there to get it. If you are looking for additional ways to save, check out the Organic Valley website where you can download and print Organic Valley Coupons.
My name is Julie Magro. This blog is a dairy of what I'm trying in the kitchen. I am on a food journey. My journey started many years ago. You see, I have always had bad feelings about processed foods. Something just didn't seem right about them. But, that doesn't mean I didn't eat them. Until recently, when the ethics and health benefits of how our food is grown and/or raised became a passion.
Interested in advertising? Email me and I'll send you a quote: jmagro@gmail.com


Long Island Cheese-heirloom pumpkin - Pumpkin Pie...what else?
Mixed Greens - Salads
Chinese Cabbage - Salads
Apples - Snacks through the week
Acorn Squash - Found this recipe from Alton brown for Squash Soup.
Leeks - Cooking through the week
Onions - Cooking through the week