

Here is what we got this week and how I plan to use it:
Leeks - Probably will make this French Leek Pie. It is really good! I've made it a few times before.
Cabbage - Probably a cabbage salad. I still have 1/2 of a white one left, I can combine them together for a pretty looking salad.
Green Peppers - Yeah! I was hoping that I would get some more because I felt like stuffing them. I plan on blogging this recipe, because last time I made them, I put them in the slow cooker and had them cook in a tomato sauce, that I used the next day for pasta. It turned out very nice, and convenient.
Acorn Squash - Saving for after the season, probably for some soup.
Apples - Will eat for snacks through week.
Delicata Squash - Think I try to remake them as a twice baked version, since I had some improvements I wanted to make from last time.
Eggplant - I am going to stuff them with some ground beef.
Brussels Sprouts - I saw this recipe for a side dish, think I'll give it a try. The recipe uses bacon, but I might use hot dogs since it is the first time the kids will be eating brussels sprouts, and I want them to have a positive experience with them so I can be more "creative" next time.
Mixed Greens - Made a salad tonight for dinner, will use the other half tomorrow night.
Summer Squash - On the BBQ -- one more time before the cold weather starts.
Onions - Use for cooking during the week.
Thursday, October 01, 2009Week 16 Maple Creek Farm CSA 2009 - September 30, 2009Tuesday, September 29, 2009Week 15 Summary & Review Here is what we got last week and how I used it: Onions - Used on the salad above. I have one left to use. Cantaloupe - We ate it for dessert one night, and snacks the next day. Green Peppers - I will stuff these. I am hoping we get a few more, so the each member of the family can have one. Apples - Ate for snacks through the week and made these little apple pies last night for dinner. I had prepared the little tarts a couple of months ago. There were waiting in the freezer for a little inspiration. Yesterday seemed like a good day to pull them out and make some apple pie.
Potatoes - Made some potato soup. Broccoli - Made Pasta & Broccoli for the kids. 2 Delicata Winter Squash - I roasted these and made a twice baked version. I read that the skin was edible, but after the first 2nd baking, the skin were pretty chewy and no one ate the skin. I roasted them one day and did the 2nd baking the next day. I should have roasted a couple potatoes with them and mashed them up with the rest of the mixture of sour cream, chopped onion (prob about 1/4 cup), butter (about 2 Tablespoons), salt and pepper so that they were more rounded on top. The taste was EXCELLENT but presentation was lacking. Kale - Kale Chips -- that I forgot in the oven after I made them. I turned the oven off to let them crisp and didn't remembered them until I turned the oven back on to preheat for the roast chicken on Sunday.....opps. Monday, September 28, 2009Homemade Granola Homemade Granola4 Cups of Old Fashioned Oats2 Cups Chopped Walnut Pieces 1/4 Cup Sesame Seeds 2/3 cup Virgin Coconut Oil 1/2 cup Raw Honey 1 Tablespoon Cinnamon 1 teaspoon Salt 3 oz. dried fruit (I use one bag of Made in Nature Organic Dried Apples), chopped 1 cup Raisins 1. Mix the Oats, Walnuts and Sesame Seeds Together. 2. Mix in the coconut oil and raw honey, making sure to coat everything. 3. Sprinkle Cinnamon and salt over the Mixture and mix in. You should now have a mixture that looks like this.  4. Spread on a greased or lined baking sheet and Bake in 300 oven for 35 mins, stirring occasionally. For a chewy granola, take out after the 35 mins are done. For a crisp granola, turn off your oven, and let the granola stay in there for another 15 minutes or so. 5. Take it out of your oven and let it cool. 6. Once cooled, mix in your dried fruit.  7. You can freeze it or store it in an air-tight container Homemade granola is always open to interpretation. Don't like walnuts? Add some chopped almonds. Don't like sesame seeds, add some flax seeds (or add them both). Don't like dried apples? Use dried apricots. This is the recipe that works for all the tastes in our family, but there are a hundred variations your family can try. Friday, September 25, 2009Week 15 Maple Creek Farm CSA 2009 - September 23, 2009Here is what we got this week and how I plan to use it:
Cantaloupe - We ate it for dessert one night, and snacks today. Green Peppers - I will stuff these Apples - Will eat for snacks through the week Onions - Will save for cooking through the week Acorn Squash - these should keep for a couple of month. I've always wanted to try making acorn squash soup, and think I may give this recipe a try: http://www.foodnetwork.com/recipes/emeril-lagasse/winter-squash-chowder-recipe/index.html Potatoes - Will store for cooking use. Beets - Think I will roast them, get some lettuce and goat cheese, make a vinaigrette and make a nice salad. Ohh - and some walnut pieces. Broccoli - Made Pasta & Broccoli for the kids last night. 2 Delicata Winter Squash (the two yellow things in the foreground). I was thinking of trying a twice baked version of this. Roasting them, then cutting them in half, scooping out the flesh, mashing it and mixing it with something and then baking it in the oven. Kale - Kale Chips, Yeah!!!! On Sunday, I am going to start something that should be interesting. I plan to time myself every time I start cooking for a week, to see how much time I actually am spending cooking every week...should be interesting. I'll share the results here of course. Thursday, September 24, 2009Homemade Tortillas with Recipe I really like to have tortillas on hand because they make an extremely quick dinner or lunch when filled with any number of goodies (we'll save that for another post). What I don't like is that most of the ones of the grocery store have a lot of extra junk in them. Trader Joes has some with basic ingredients, but they often go bad before I use them since I am saving them for "emergency" use. So I wondered, how hard could it be to make them myself, when they only consist of a handful of ingredients? The Answer: SUPER EASY! I looked online and saw a few variations of the same recipe. Here is what I came up with: 1. Stir Together 2 cup of flour 1/2 tsp. salt 1/2 tsp. baking powder 2. Work In: 1 Tablespoon butter 3. Add until you have a soft dough: 3/4 cup warm water 4. Knead for 5 minutes  5. Divide into 1/4 cup (3 oz) portions  6. Roll Flat into 6-inch circles  7. Brown on both sides in a medium-hot pan.   8. Top with your favorites and enjoy! Late Summer Peach Torte One of my favorite blogs is Bakers Banter by King Arthur Flour. First, if you've never tried their flour, you should; you WILL notice a difference in the way things turn out. Anyway, they posted a recipe this week for Late Summer Berry Torte, a seemingly very popular recipe that has been around for years. Now you may be wondering why didn't you use berries? Well, for the past week every time I opened my fridge four little peaches that were beyond eating, but still good for baking, were calling out to me, asking "what are you going to do with us?" This recipe seemed like a good chance to So I made the cake, my two-year-old put the sliced peaches on top and 30 minutes later, we had a very good peach cake for a morning snack. The kids liked it, I liked it, we even hopped in the car and delivered some to the hubby at work, and he liked it. This was excellent and I think it could really be used with any fruit you have on hand. Here is the link to the recipe for all who want to give it a try: Late Summer Berry Torte  Above is not a very good picture....but you get the point. Organize Recipes How do you organize your recipes? Here is my system: I have a shelf in my pantry. On either side of the food are the cookbooks. The picture above is the right side (books pictured left to right are: Not Your Mother's Slow Cooker, The Splendid Table's How to Eat Supper, Rustic European Breads from your Bread Machine, I'm Just Here for the Food, New Good Food): The purple folder has all the recipes I have printed or people have given me that I want to try. The white binder has all the recipes that I've tried and like and will make again in page protectors pictured below (organized by topic).  I'm not a big fan of cookbooks that only give you recipes. I like a cookbook that gives you information and techniques with a few suggestions on how you can use these techniques. I have a separate shelf in my dining room with my whole cookbook collection, but the books above and below (the left side: books pictured top to bottom are: Better Homes & Gardens New Cookbook, Pressure Perfect, Williams Sonoma Kitchen Companion) are my most referenced, when I am cooking and have a question on a technicality of the food I am using.  I would love to hear in the comments how you organize your recipes and cookbooks. Wednesday, September 23, 2009Week 14 Summary and ReviewHere is how I used what we got last week:
Apples - Ate for snacks for the week. Tomatoes - the kids ate them for dinner Potatoes - Made some potato soup Purple "Green" Beans - Still need to blanch, freeze and save for winter.. Beets - Roasted them and froze them for winter Cabbage - Make the Cabbage soup pictured above. Added some white beans - very good. The kids aren't super big on cabbage soup, so I made them some whole wheat biscuits to go with them. Not the healthiest of alternatives, but it is a nice treat for them every once and awhile. Peppers - Still saving. Think I will slice them and freeze for use in salsa for winter. Purple Onions - used for cooking Mustard Greens - I will blanch them and try using in what is turning into my "choose a green lasagna recipe". Tuesday, September 22, 2009My Cooking Philosophy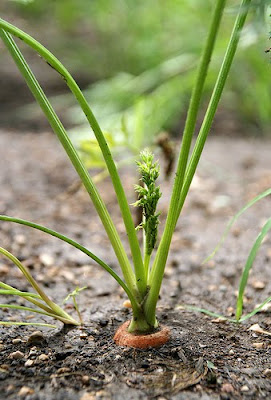 Photo Credit: mcbeth I like to believe it all started with a Carrot. I must have been 4 or 5 years old when my Great Grandma K took me outside and let me pick carrots from her garden. I vividly remember making a pledge that one day I would grow my own carrots in my own garden. And I'd like to think that is what started my enjoyment of cooking and health. A joy that has been fed by many along the way:
So for many years I have had these anti-processed food views about cooking, food and health but it has always been based on my experience rather than anything I've learned. Then I watched Food Inc., And read In Defense of Food And read The Omnivores Dilemma And read Fast Food Nation And now I am educated. I know why processed food is bad. I know that most of the nutritional advice I've been feed by the "experts" was a load of junk. I know that there is a human cost to the food I buy. I know why I like our eggs, meat, dairy and produce to be raised organically eating the same things they were 100 years ago by people paid a fair wage to produce it. And I am very happy to begin this journey of learning how to cook with these foods.
Subscribe to:
Posts (Atom)
|
|
|


Several Times Throughout the share season, I've mentioned that I am going to make Broccoli and Pasta. This dish is a real winner in our house. Everyone REALLY likes it, it is really fast, and I almost always have the ingredients on hand when dinnertime strikes.
So here is what I do (the remaining pictures are from a different batch, the orecchiette is really the best pasta to make it with, but any pasta will do.)
1. Do the Math. The broccoli and pasta are going to be cooking in the same pot. The broccoli needs 8 minutes. So take whatever your pasta package tell you, minus 8 and cook it for that long. Set a buzzer, you'll be busy doing other things.
2. Get the water boiling, drop in your pasta.
3. Cut the broccoli up (I show one head here, but you can really do it to taste. I usually do 2, but sometimes even three), slicing it into bite sized pieces - use the stems too!
4. When your buzzer goes off, drop in your cut-up broccoli,. Set your timer again for 8 minutes.
5. While the pasta and broccoli are finishing up cooking, open the anchovies. Take 1/2 of them out and chop them up really fine. Chop up 2-4 cloves of garlic.
6. When the pasta finishes, drain it. Put the pan back on the stove. Pour enough olive oil in the pan to cover the bottom. Drop in your chopped garlic and anchovies, and add a few shakes of the hot pepper flakes. Saute them until the garlic just begin to brown. Remove from the heat, throw the pasta back in, add some salt.
7. Plate it up and add some fresh Parmigiano Reggiano and fresh pepper. [KID VERSION: Don't put their pasta back in the anchovy mix. Put it right on their plates add some butter and parmigiano and they are good to go.